About expense reports in the browser
You can now enter expense reports and approve expense reports from a browser-based task making it easier and more intuitive for all users.
With this new expense report feature you get:
- A new interface where you see the expense report and expense report detail all on one screen. Entering expense report details and saving will not close the details window because everything is on one screen. This screen also breaks out totals at the top.
- The ability for users to enter expense reports from browsers like Chrome or Firefox in addition to Internet Explorer.
- Separate security for Timesheets and Expense Reports.
- The ability to print, submit, and approve multiple expense reports.
- The same functionality with the new expense reports features as the old.
-
The accepted file attachment types for expense reports in the browser AND Click-once expense reports are: pdf, xps, txt, rtf, jpeg, jpg, png, heif, heic, tiff, xls, xlsx, numbers, doc, docx, pages. Other file types will not be uploaded.
- Access to Manage > Time & Expense feature. You control when employees can access the new expense report feature by giving them access to the menu option in Roles.
Ajera uses the browser spell check so you can verify the spelling before submitting expense reports.
Click here for a quick use guide on how to use the new Expense Reports in the browser feature.
The following is a typical sequence of events for processing expenses:
- An employee enters an expense report and can add attachments (optional).
- When finished entering all expenses, the employee submits the expense report.
- If approvals are required (
 > Setup > Company > Preferences > Time & Expense Entry tab), the supervisor and/or accounting
manager reviews the expense report and does one of the following:
> Setup > Company > Preferences > Time & Expense Entry tab), the supervisor and/or accounting
manager reviews the expense report and does one of the following:
- Approves the expense report.
- Rejects an item on the expense report, entering comments about the rejected item. The employee then corrects the rejected expense and resubmits the expense report.
- After an expense report is approved (if approvals are required) or submitted (if no approvals are required), Ajera processes the expense report, which creates a vendor invoice for the non-credit card transactions and bank entries for the credit card transactions.
- If you are using approvals and if the employee is set up to edit a processed expense report, the employee may make changes and an accounting or supervisor may need to reapprove the expense report.
Depending on the options selected on the ![]() > Setup > Company > Preferences > Time & Expense Entry tab, the supervisor and accounting manager may have access
to change an employee’s expense report. After you pay the vendor invoice for the expense report, however, no changes can be made.
> Setup > Company > Preferences > Time & Expense Entry tab, the supervisor and accounting manager may have access
to change an employee’s expense report. After you pay the vendor invoice for the expense report, however, no changes can be made.
Working with expense reports
The following events occur when you process expenses at your company:
|
When this occurs |
This happens |
||
|---|---|---|---|
|
Save |
Ajera saves the expense report that you entered. |
||
|
Submit |
The employee finished entering the expense report and is ready for the supervisor/accounting manager to review it. Now, to make any changes to the expense report, the employee must first unsubmit it. However, the supervisor or accounting manager can change a submitted expense report if their company preferences for time and expense entry are set up to permit it. Ajera processes the expense report unless company preferences for time and expense entry require supervisor or accounting approvals before processing. |
||
|
Approve |
The supervisor/accounting manager approves the expense report submitted by the employee. The expense report appears as Approved on the expense report list. Ajera processes the expense report after the supervisor, accounting manager, or both approve the expense report (depending on approval requirements set up in company preferences for time and expense entry). |
||
|
Reject |
The supervisor/accounting manager rejects an item in the expense report. The expense report appears as Expense Rejected on the expense report list. The employee must correct and submit the expense report again. |
||
|
Unsubmit |
The employee decides the expense report is not ready for approval after all. An employee can change the expense report if it has not yet been approved or processed. |
||
|
Unapprove |
A supervisor/accounting manager decides not to approve the expense report after all. You can unapprove an expense report only if:
|
||
|
Delete |
You cannot delete an expense report after it is submitted. |
||
|
Ajera creates a vendor invoice for the non-credit card entries, reflects the credit card entries on the bank register, and makes entries available in client invoices. It also reflects the changes on reports and financials.
When Ajera processes the expense report depends on how your approvals are set up in company preferences for time and expense entry:
After Ajera processes the expense report, you cannot unapprove it. If you use multi-company, Ajera makes entries based on the employee's company, transaction type, and payment method. For more information, see About expense reports with multi-company. |
|||
| Reapproval | If an employee edits a processed expense report, a supervisor/accounting manager will need to reapprove the expense report. |
Getting to know the Expense Report user interface
The Expense Report user interface is split up into 4 main sections.
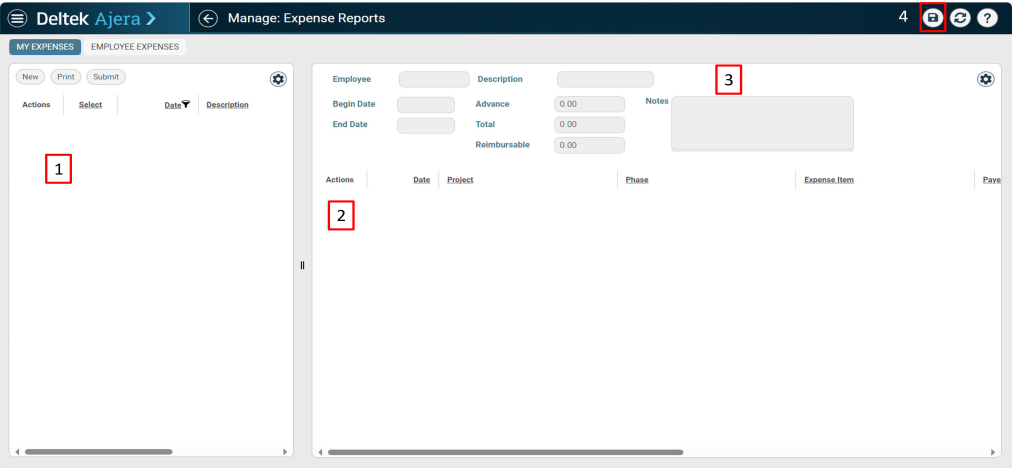
1: Expense Report List window
- From the My Expenses tab of the expense report list window, you can view expense reports, create new expense reports, submit expense reports, or print expense reports.
- From the Employee Expenses tab of the expense report list window, you can approve, reject, or reapprove employee expense reports if you have the correct permissions.
- You can preview uploaded attachments.
- In the Actions column, you can View Expense Report Notes, Submit, Unsubmit, Import Credit Card List, or Delete an expense report.
- You can resize the pane by clicking and dragging the
 icon.
icon. - You can click the column heading to include or exclude more expense reports in the expense report list using the widget filter, sort, and group functionality.
- Click the
 to add optional columns.
2: Expense Report Detail window
- In the expense report detail window, you can add expense rows.
- Click the to add optional columns.
- You can click the column heading to include or exclude more expense reports in the expense report list using the widget filter, sort, and group functionality.
3. Expense Report summary and totals
- In this section, you can view or change the Begin and End dates, enter expense report descriptions, enter expense report notes, enter advance amounts, and review expense report totals.
4: Save Button
- This is where the save button is located.